Thinking about ink
As I was printing this afternoon, I was thinking of you—and the questions about ink that come up during classes and demos.
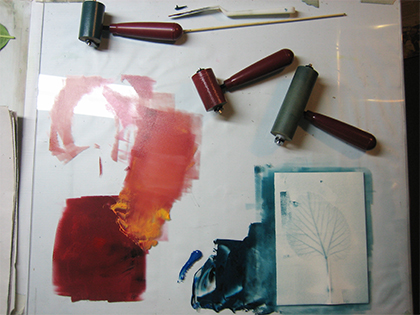
Your prints will be more interesting if you mix one ink color with another, or, as an alternative, “dirty up” the ink by adding a tiny amount of black ink. Using ink straight from the tube just looks too ordinary.When mixing colors, place a “nurdle” (a small amount) of the lighter color of ink on your palette. Add to that nurdle a squeeze of a second color—the darker and more influential color.
The palette
A palette is the smooth surface on which we roll out the ink and also apply the ink to the specimens. Any smooth, flat, clean surface works including a piece of glass, Plexiglas, quilter’s Mylar (available at Joann for about $4), or a piece of Reynold’s freezer paper with the shiny side placed facing up, held in place on a smooth table with masking tape.
Details about ink
Speedball water-soluble printmaking inks are affordable, readily available, easy to use, and enjoyable. What’s fun about these inks is that although they dry fairly quickly, your mixing palette can be “reactivated” by misting it with water from your spray bottle. The colors I always have nearby are the primary colors—red, yellow, and blue—plus black, green (it’s difficult to mix a true green from blue and yellow), dark yellow, turquoise, metallic gold, and extender. Brown, orange, and violet (purple) are pleasing colors, but not essential. Dark pink, while a favorite with young girls, will stain your soft-rubber brayer and is not as lightfast as the other inks mentioned above.
Extender is a magical component in the printing process. Extender is a colorless medium that “extends” color, stretching the pigment you add to the extender by making the color less intense or more transparent. Treat the extender as your lighter color and add your inks to it—in small amounts.
The process of inking your specimens
The word “specimens” seems scientific, but it pertains to the botanical materials nature printers print. In our case, the botanical materials—or specimens—are the plate, just as a carved linoleum block or block of wood is the plate for a printmaker making relief prints. The surface in both nature printing and relief printing is raised to receive the application of ink that is applied with a soft-rubber brayer.
You can always add more ink to your palette, but if you start your print-making process with too much ink, you’ll waste ink and your time getting the ink to the right consistency. That consistency appears to have the same surface as medium-grit sandpaper—in other words, fairly smooth.
After squeezing the nurdles of ink onto your palette, smear them quickly with a palette knife or plastic picnic knife—just a couple of quick strokes—in the same manner you’d spread peanut butter on a piece of toast. The flattened nurdles of ink are now more likely to blend somewhat together instead of remaining as dot-like shapes on your palette. I seldom mix the inks with the palette knife until a new color is created; I usually allow some mottling or unmixed colors to occur.
Ink has tack—stickiness—which allows the ink to stick in tiny points to the surface of plates, linoleum blocks, or leaves in our case. This tack protrudes slightly from the surface of the ink. To achieve the most refined detail when printing leaves, it’s best, after working the ink with your brayer from left to right and top to bottom, to move your brayer in one direction—away from yourself. You’ll continue that movement when applying ink to the underside of your leaves (where the veins are more prominent). Start applying ink at the base of the leaf, moving your brayer with a very light touch, toward the tip of the leaf. Follow the grain or direction of the veins so as to cover the surface of the leaf with a light, even application of ink. Remember to ink the stem of the leaf before making your print.
A recent discovery I’ve made is to have a second leaf of the same type that you’re printing to refer to when trying to match the green color of the top side of the leaf. In yet another surprising observation of the beauty and diversity of nature, when I really pay attention to the leaves I print, the top side of the leaf usually has a deeper color than does the underside.


